Moored at Home in Bumble Hole

Moored at Home in Bumble Hole
At Home - Moored at Bumble Hole

Thursday, 16 June 2011

A hole in my bucket !!!!!!!!!

Have now removed all the internal bulkheads and removed any wood that needed replacement from the side panels below the gunnels along with the insulation. Pleased to see that he metal is sound and the original hammerite finish is still good......on the sides...

Standing in the middle, I can touch both sides


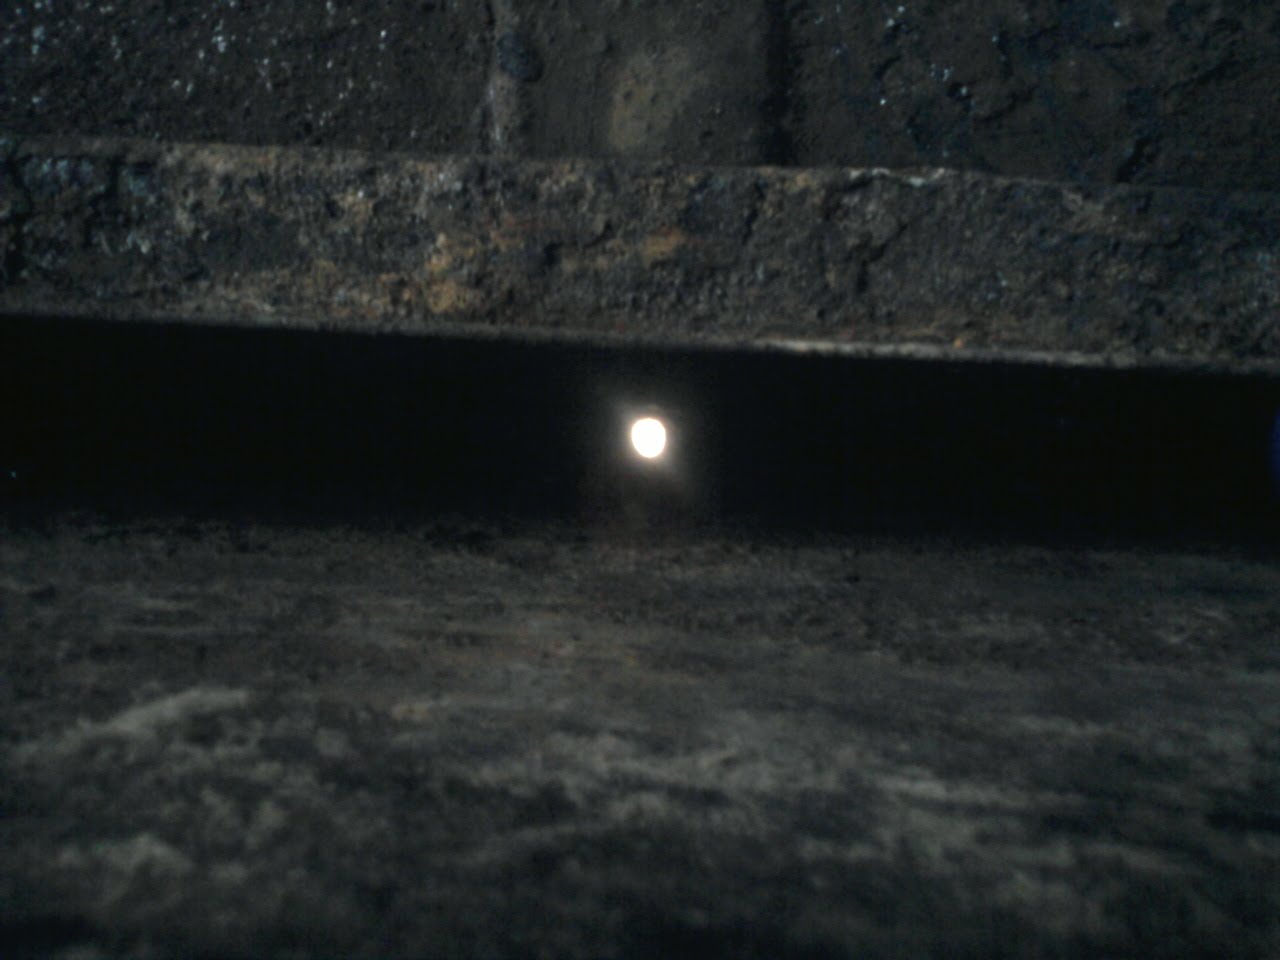
However when I cleaned out the the bottom corners, HORROR of HORROR
daylight peeped through ..... and I spy a hole....in the bottom.......a sharp intake of breath
.........and words I cant print.......

On close inspection, the hole is NOT rust related, many sighs of relief, phew.

The hole is perfectly round, 1/4" diameter and very much man made ????? did it have a plug hole / drain hole.......I wonder.......?????

The good news is that the thickness of the base is established at 1/2 ", the metal is sound.....and welding in a bolt will seal it, but I will make further investigations with the builder......Jim would be joking about corks and bungs......and a Hancock impersonation.

Anyway, I am not panicing...Mr Mannering

Saturday, 11 June 2011

Out goes the kitchen sink

After a week on the outside and until I can get more red oxide paint, I got stuck in to the interior and more cleaning rust, but also removing the 2 main bulkheads and the kitchen unit (2 small bulkheads still in place) The gas and water pipes have gone...only the water to be renewed cos not having anything gas on board...bottles far too heavy for me to manover, particularly in the winter getting them on an off the boat, bugger that....I remember us almost dropping one in the cut once.!!!!!! and its jolly expensive....changing 2 bottles twice a month ... harrumph harrumph indeed...... .so I am sticking to the decision and will have solid fuel and diesel only with solar panels and wind turbine back up. Saw some cracking kit at the crick boat show so by the time I will be ready there should be plenty of choice....
Needed to get a crowbar to the plywood side panels then a very good mask when removing the insulation..... and held my breath.!!!!!! anyway have now got a major start on the inside, almost 90% of the floor exposed and half the walls. but only below the gunnels.....above appears to need not much ...

Revealing so much of the interior gave me the idea that if I could clean and paint the floor where the solid fuel fire is going to be, then I could install it before the winter, and work through the cold weather....with the means to make tea and jacket potatoes to boot....ha whoopydooo...so I am spurred on. Have already seen the stove....its called the Portland multifuel for marine and has all the new boat safety standards / regulations accounted for, like insulated sides and flue, saftey rail and convection holes... Could be a Chrissy treat......

Sitting inside is making me start to think about wires and pipes and switches and lighting.....back to drawings eh !! ha ha


Monday, 6 June 2011

About time too

After a lot of cleaning and wirebrushing, finally I was able to give the skirt its first coat of red oxide paint......now almost all the way round, 'she's lookin good'..... Also given the roof another layer ....theres a lot of filler work to be done yet on the roof and I have to find out how the stuff I have will work.....Dimitrol ???? I think thats what its called....the tech support said it would be good enough to fill holes in a chieftan tank !!!!! so I thought to myself that it would be just the job for WildRose ha ha...

The sides will need rubbing down again, then a coat of Grey before the winter

Had a good visit to the Crick Boat Show last weekend.........found lots of goodies and ideas.......particularly the new design Portway multifuel stove.....built to meet new boat safety standards.....I thought that it might be a good idea to fit one in this summer so that I can work through the winter .... Also been looking for a marine electrics course, tey used to run them at the Stourport Marina Clubhouse.. I thought that it might be a good idea to find out how it all should work befor I start (that will be a refreshing change for impulsive me ha ha)...and whilst I am stripping out the inside I can get a better idea of what I can or can't do..... No sign of getting the engine fitted yet, but there is have plenty I can get on with. Back soon

Tuesday, 19 April 2011

Its going to be a very dirty year ......


Now the terraria van has gone.......my goodness there are lots of stories attached to that !!!!! ......anyway, gradually making a pathway through 'stuff' to open up the front deck......holes & rust abound
Inside, the bottom is sound but some patching to be done on the front deck ... is that fore or aft ????? Actually its been handy to have the holes in the front deck as it has let light into the compartment under it where the water tank is situated and it would appear to be quite sound.....will find out when we attach a hose to it ....not holding my breath though ha ha......but hope it is sound as it is pretty solidly in place and it would be a relief to not have to shift it.


The box sections in the engine compartment is still waiting to be cut out so I am continuing the removal of rust lumps/flakes/dust from inside and getting the back doors & roof ready for its first layer of primer .....


Oh what a dirty days are ahead .... again ha ha....and its all good fun

I was no longer grey by the afternoon yesterday...a sort of auburn/rust colour ha ha...and the suntan ... well it all washed orf with a bit of scrubbing phew...

Sunday, 10 April 2011

Rust, rust more rust and holes

Took the tarpaulin off the front yesterday....revealing more rust and holes.....The front deck will probably need replacement as these holes are just the start...... These are where the moorhen used to have a nest ....bless her... ah well it all adds to the challenge....ha ha.....can feel my elbowes creaking at the thought......

Phone case gives an idea of the size of the holes.......and I havent done any poking or prodding yet !!!!!! reminds me of the olf fuel tank...and thats had to go......front deck cant go anywhere so it will have to be cleaned up and either patched or overlaid.....


Just gearing myself up and finding the tools for the next burst of action next week.....

Thursday, 7 April 2011

Warming up

Well although its just the right weather to get started, at the moment Wildrose is blocked in by a big red delapidated van and I cant get at her....the van is due to go before easter and so I am doing stuff that needs doing at home whilst I get ready for a big push..... So whilst I am warming up, here is a birds eye view of a fence I have almost finished ... was just checking how straight it is ha...... Am working on making the telescope shed easier to get into and generally finishing off things so that I can focus on the main course of action. I have been promised that the engine can go in after easter...but I need to clean out and finish painting the engine compartment first.........so I need to get at it.........

Sunday, 20 March 2011

I see a Big Moon Rising

A good day to get the telescope out and find out how it works...updates will go on Jims Astronomy Blog when I get it up and running, something Jm started and deserves to be continued.......Well, so many things to connect, but memory serves me well and in the sunshine spent the day playing with it all. I didnt find the Deep Sk Imager untill this morning, didn't know what it was until I did some research on the web...was sure there was one somewhere....and there it was safe?? in an old camera bag with a Silvester Cat sitting on top !!!!......
So its ready for next time, however I did manage to set up the webcam to my laptop and took a series of moon rising shots....it did seem to get bigger as the night went on....the cam had to move a couple of times though....and I will get better at all this with practice
It looked stunning through the scope......will have the imager going next time.....

Click to play this Smilebox slideshow
Create your own slideshow - Powered by Smilebox
Slideshow design customized with Smilebox

About Me

My photo
Livin and enjoyin every second of every day

Followers